Saturday, March 31, 2012

Do You Speak Cricut Saturday - Stretch Your Imagination

Welcome to this week’s edition of Do You Speak Cricut? Every Saturday will feature a different Cricut cartridge review from one of the Made Especially For You design team members. This feature was added to the blog in order to give potential cartridge buyers a better idea of what each cart has to offer. Click here to view last week's Spring Fever Holiday cartridge review. This week, I'm going to share my review of the Stretch Your Imagination cartridge.

The Stretch Your Imagination cartridge is a perfect year-round cartridge. Featuring images for all seasons and celebrations, this cartridge is a must-have for any low-budget crafter who is looking to purchase cartridges that cover a wide array of celebrations rather than just one topic. Each icon features a "stretched out" version of itself allowing for more flexibility with your projects. 

Here's a look at the icons included on the cartridge: 


The cartridge has six creative features: Layers, Silhouette, Card, Card Frame, Shadow, and Blackout. 
The Layers feature is fairly self-explanatory. Each icon has additional layers that can be made to complete the image. Always remember that the size of the layer does NOT need to be changed to fit your image, the Cricut automatically sizes it to the image you have already cut. 

The Silhouette feature takes the original image and gives it in outline, so to speak. The Silhoutte feature works on the layers as well.

The Card feature creates a basic card using the image you have selected, whether it be the regular image or the "stretched out" version. All cards using the regular images are squares, and all cards made using the "stretched out" images are rectangles. When using the Card feature, all images are cut in the center of the card. 

This picture (I'm terribly sorry about the poor lighting and coloring) shows the Card feature along with the Card Frame feature (see below). The cards are made from the pink patterned paper and are both cut at 4". The frames are the red cardstock. 

The Card Frame feature creates a frame to the card you have just made. Remember to make it the same as the card. Each image has its own creative frame, with the "stretched out" images having a more narrow version of the regular frame. 


The Shadow feature creates a shadow for the images you have cut, allowing more opportunities for layering. Again, you do not need to adjust the size of your shadow, keep it the same size as the original image you have cut. The Cricut knows the correct size it needs to be to fit the image. 

The Blackout feature is similar to cutting a regular image, with the exception that it removes the indented lines that indicate where the layered cuts are supposed to be place. It creates just a solid shape of the image. This is helpful if you're using basic cuts for example, in a classroom, and want the kids to be able to decorate a frog, or something to that effect, without having the indented lines be in the way. (I use this technique all the time when I do story time crafts). 

I love this cartridge because of how many purposes it has. It contains images for all seasons and most holidays, and even occasions such as back to school, weddings, and baby showers. Although this was my first time using the Card feature, I loved how simple it was to make, which is perfect if you ever need a last-minute card and don't have a lot of time to put a whole lot of detail into it. 

The cartridge regularly retails for $49.99 on both the Cricut site and Cricutmachine.com, but I did find it on Amazon for $19.99. My cart came with a bundle I purchased on Cricutmachine.com, so I'd recommend purchasing it that way if you can't find it on Amazon or another website.

Here are a couple of past cards I've made using the Stretch Your Imagination cartridge:


Thanks so much for reading the review! If you have any questions about the cartridge, please don't hesitate to ask! :)

Ashley

Thursday, March 29, 2012

Thursday Craft 'n Chat - Resist Embossing


Hey Everyone...welcome to another Thursday Craft 'n Chat with Made Especially For You. I'm Abby from Scrappin Abby and I am really excited to share some scrappy tips/techiniques with you. Today I will be showing you how to create a really quick and easy card by using the resist embossing technique.


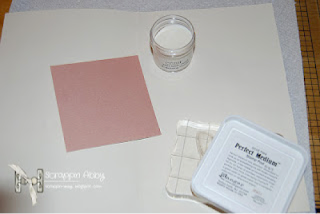
I will put a complete list of the supplies I used at the end of this post but first let me show you what I started out with...
I chose some paper & the stamped images I wanted to use on my card. Then I pulled out my Perfect Medium, clear embossing powder, my heat tool and the inks I wanted to use on this project.

Before I started stamping my images, I cut my paper for the card. It's much easier if you have your papers trimmed and ready to go before you start embossing.

In this photo you can see that I have my paper all ready to go. I chose to use a butterfly on this piece..you can see it on my clear stamping block. I applied some Perfect Medium to the image...make sure you apply a good amount as this will help the emobssing powder adhere to the image which results in a nice clear stamped image. Now you don't have to use Perfect Medium, you can use any form of embossing stamp pad. I just happen to like this particular brand best : )  You can also use an embossing pen if you have smaller stamps you want to use or if you want to add more detail to your stamped image.


Here's a better picture of how I "inked" up my stamp with the Perfect Medium. You can pat your stamp pad on top of your stamp or you can flip it around like it is in this picture...just depends on which method you are more comfortable with. Once you've juiced up your stamp...go ahead and press it onto your paper..be sure to press firmly but don't move it around or else your image won't come out crisp and clean...


After you stamp your image you will want to go ahead and sprinkle your clear embossing powder over your image. A few pictures above you can see that I had my embossing powder out and open so it was ready for this next step. I also wanted to note that you will need to make sure you are using CLEAR embossing powder when doing this technique. I will show you why in just a moment. After you dust off the excess embossing powder you will use your heat tool over the image to emboss it. I wasn't able to take a picture of this process while I was doing it since I was alone...sorry about that.


This is what you will see after using your heat tool. Next you will ink your image.


I start off by inking up my blending tool and then going over the entire piece of CS and over the embossed image. Now you can ink this as dark or as light as you want..I chose to make my edges darker so the image "popped" a bit more.

This is what you will see after you ink your embossed image. Now you can see why you want to use clear embossing powder..this is what makes the "resist" embossing. The ink won't adhere to the stamped image, only on the paper around it...pretty cool huh : )

The next couple of photos are of the same process I went over above but are for the stamped sentiment on my card. I wanted to show you how this same process looks on lighter paper and with a different color of ink....


And here's the completed project....


Here's better view of the resist embossing...

See how cool that looks? I really enjoy using this technique on my projects. You can use this on not only cards but layouts, tags, gift bags and all sorts of other scrappy projects. The possibilites are endless with this technique.

If you haven't tried resist embossing before I want to encourage you to do so. It's super easy to do and you get such a beautiful & unique look on your projects when you are done.

Thanks for letting me share this technique & project with you.. I had a lot of fun working on this card.

Happy Scrappin!

Abby
http://scrappin-abby.blogspot.com/

Products used:
DCWV-Coral Couture Stack
Ranger Perfect Medium
Tim Holtz Distress Ink-Frayed Burlap
Close To My Heart Clear Embossing Powder
Heat tool
The Twinery-Caribbean twine
The Girls Paperie Market Trims-Jubilee
My Minds Eye clear stamps

Monday, March 26, 2012

Distressed Ink Challenge & A Blog Candy Winner!

Welcome back for another weekly challenge this Monday here at Made Especially For You! I hope everyone had a lovely weekend, and thanks so much to all those who traveled along with us during our Destination hop that took place this past weekend. As promised, I have a winner for my travel-themed souvenir blog candy! The lucky winner is...

#2 Reny said... "Waving at you from Southern Illinois!"

Congratulations, Reny! I'll be sending you an email so you can claim your prize. I'll need to hear back from you within one week, otherwise I'll have to choose another winner. Thanks for participating in the hop!

And now on to this week's challenge - create a card using the technique of distressed ink. 

I'm extremely new to using the technique of distressed ink on my cards, which is why I love doing these technique challenges. I don't have the proper tools to distress ink (and didn't have enough money in my craft budget to spend on buying any tools, since I purchased the blog candy for the hop and also a Zig glue pen to make my Cricut mats resticky) so I improvised and dabbed my finger in ink and then ran it along the edge of the paper. :) I had hoped it would turn out more brown, but because the paper is a cream color it looks a little more orange than it should. :( Oh well, gotta learn somehow!

The bear is from the Create A Critter cartridge and is cut at 3". The 'happy birthday' is also from the Create A Critter cartridge and is cut at 1.5." It's hard to tell in the picture, but the green paper is embossed with a cupcake pattern. I believe the card is 4.5" by 6."

To enter the challenge, all you have to do is post your challenge creation on your blog and then link it up to the linky gadget at the bottom of the 'Weekly Challenge' page here on the blog. The design team (and our guest designer this week, Karen from Crafted With Love By Karen) have provided some great inspiration for this week's challenge! We'd love if you played along with us. :)

The randomly chosen winner of this week's challenge will win their choice of two sheets of stamps from our awesome sponsor, Whoopsi Daisy! The winner will also be offered a one-week guest designer position for one of our challenges, and the top three cards will be chosen by the design team and will receive a badge to post on their blogs.

It's your last chance to enter this month's lucky link-up! Throughout the month of March, you have unlimited opportunities to win the Spring Fever Cricut cartridge being given away by our awesome Sponsor Coordinator and Sketch Designer, Beckie from Just B Creative Crazy. Here are the guidelines for the giveaway:
- You will receive one entry for every card you enter in our weekly challenges (you can enter as many cards as you want for each challenge as long as they each have their own post on your blog)
- You will receive one entry for liking the Made Especially For You Facebook page
- You will receive one entry for every friend you get to link up to one of our challenges (your friend must let us know in their post that they have linked up because of you, otherwise we can't count it)


The winner of the cartridge will be randomly chosen and announced on Monday April 2nd. 


Thanks for stopping by!
Ashley

Sunday, March 25, 2012

Destination Blog Hop - Day 2

Welcome to our adventure! We're off to see great things! Perhaps by car, train, or plane, or maybe by boat, no matter what - it'll be a great trip! No pesky security pat downs, or pesky luggage to deal with, or those extra fees that seem to mount up!

You won't need your cameras, or money for gas, but you will want to watch for souvenirs to pick up! So grab your favorite drink and curl up and make yourself comfortable! No need to share your seat unless you've invited guests to take part!

Here at our ports of call, you'll need to leave your comments! Many of them will offer souvenirs (blog candy) and here at mine - lots to be had!
1. A Destination Cricut Cartridge
2. A travel album filled with embellishments to remember your trip
3. Misc. goodies to numerous to mention!
4. My own travel-themed souvenir blog candy!

To be eligible to win the blog candy, all you have to do is become a follower (if you aren't already) and leave a comment on either day of the hop. You'll receive two entries if you comment on both days! :) I'll announce the winner of my blog candy on Monday March 26th.

Now be sure to be a follower of my blog! It's easy you'll see, just click on the link! Leave your comments at every port! They've worked really hard make your trip pleasurable!
Today we're stopping in the lovely location of Oahu. I created another postcard (using the Destinations cart, of course) to attract you to this wonderful, tropical destination. I've never been to Oahu (or Hawaii, for that matter) but I'd love to visit someday! :)

Here's the entire itinerary in case you get lost! If you've come from Liz's blog, then you're in the right place. If you've just come across the hop and would like to start at the beginning, then please visit Janet's blog.


Thanks for visiting us today!  You're next port will be: Lisa's blog!

Our travel director, Janet, will pick the winners of the prizes Monday!

Saturday, March 24, 2012

Destination Blog Hop - Day 1

Welcome to our adventure! We're off to see great things! Perhaps by car, train, or plane, or maybe by boat, no matter what - it'll be a great trip! No pesky security pat downs, or pesky luggage to deal with, or those extra fees that seem to mount up!

You won't need your cameras, or money for gas, but you will want to watch for souvenirs to pick up! So grab your favorite drink and curl up and make yourself comfortable! No need to share your seat unless you've invited guests to take part!

Here at our ports of call, you'll need to leave your comments! Many of them will offer souvenirs (blog candy) and here at mine - lots to be had!
1. A Destination Cricut Cartridge
2. A travel album filled with embellishments to remember your trip
3. Misc. goodies to numerous to mention!
4. My own travel-themed souvenir blog candy!

To be eligible to win the blog candy, all you have to do is become a follower (if you aren't already) and leave a comment on either day of the hop. You'll receive two entries if you comment on both days! :) I'll announce the winner of my blog candy on Monday March 26th.

Now be sure to be a follower of my blog! It's easy you'll see, just click on the link! Leave your comments at every port! They've worked really hard make your trip pleasurable!


Today we're stopping in the lovely city (and also my hometown) of Chicago here at Made Especially For You! I've created a Chicago postcard using the Destinations cart.


Here's the entire itinerary in case you get lost! If you've come from Liz's blog, then you're in the right place. If you've just come across the hop and would like to start at the beginning, then please visit Janet's blog.


Thanks for visiting us today!  You're next port will be: Lisa's blog!

Our travel director, Janet, will pick the winners of the prizes Monday!
Related Posts Plugin for WordPress, Blogger...