Friday, June 15, 2012

GoFish! Patriotic Challenge

Happy Friday! It's been one of those weeks where I cannot wait for the weekend - I have the entire weekend off work for the first time in a while and am looking forward to working ahead on some cards and getting some other stuff done around the house, not to mention celebrating Father's Day. :)

The card I'm going to be sharing with you today is my first card as a design team member on the GoFish! Challenge blog. How exciting! If you've never heard of GoFish! before, they post a new challenge on the 1st and 15th of every month and all projects are welcome as long as they fit the theme of the challenge. Winners are chosen from each challenge and receive a prize from the challenge sponsor. Check out this week's challenge:


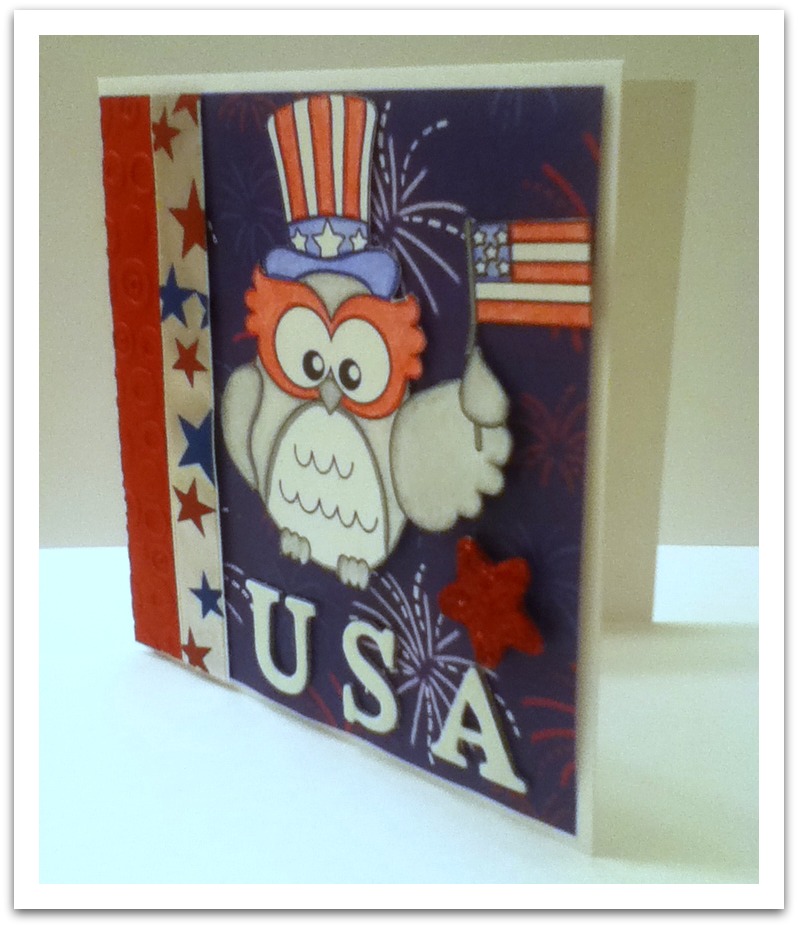
As I work ahead on creating cards for the design teams I'm on it seems like there's A LOT of 4th of July/patriotic challenges coming up! Luckily they're super fun to make, otherwise I would not be a happy crafter, LOL. Here's a look at the patriotic card I made for this week's challenge:


The adorable owl digi was given away as a freebie during Jaded Blossom's Customer Blog Hop about a month ago. It was too cute to pass up! They gave away a couple of other fun freebies, and if you like what you see, they're sponsoring this GoFish! Challenge, so make sure to submit a project for a chance to win!

Thanks so much for stopping by, have an awesome weekend and a Happy Father's Day!

Ashley

Free Floral Digi Challenge @ Digi Haven

It's time for Digi Haven's second challenge! Thanks so much to all those who participated in our first challenge last week, it was a huge success and we enjoyed seeing all of your creative projects! Now onto this week's challenge...

The Challenge:
Use any FREE digital Flower/Floral image you wish. Pair it up with another Free digital image (i.e. add a toad, fairy, butterfly etc.) if you wish. The image(s) can be a forever freebie, limited time freebie or freebie of the month as long as it’s free for the duration of this challenge.  Please be sure to link back to the original artist or website on your blog.  This challenge ends on Thursday and the winners will be posted on Sunday.

There are SO many fun, free, floral digis out there, but I couldn't resist using another one of Elizabeth Dulemba's images and chose to use this a flower coloring page, which can be found here


I love the color combo on this card, it's very springy/summery. The background paper is by Recollections from the Bold Basics paper pad (one of my new favorites - I'm ADDICTED) and I used the April Showers Cricut cartridge to cut the butterfly, which I then embossed with my Cuttlebug using the D'vine Swirl embossing folder. I used some twine to make the card a little more fun and then attached the sentiment. The colors look a little washed out in the picture, but the card is much bolder in person.

Come play along with us at Digi Haven and show off your coloring skills by finding a free floral digi to color and enter in our challenge!

Ashley

Thursday, June 14, 2012

Anything Goes at Stamping with the Dragon!

It's time for another weekly challenge over at Stamping with the Dragon! This week's challenge is a fun one - it's anything goes! One lucky winner will receive two images of their choice from the Stamping Dragon Designs store. They have some super cute images, let me tell ya! :)

For this week's anything goes challenge, I decided to make a birthday card using the adorable Rupert's Party image, which can be found here in the Stamping Dragon store.


I colored Rupert with my Prismacolor pencils and paired him with some fun birthday paper from the Birthday Extravaganza stack by The Paper studio. The 'happy birthday' die cut is a phrase feature cut from the Create a Critter cartridge at 1.5" if I remember right. The presents are Cuttlebug die cuts.

Stop by Stamping with the Dragon to see what other inspiration the design team members have cooked up for you and to enter your anything goes challenge card, we'd love if you played along with us!

Ashley

Thursday Craft 'n Chat - Wine Glass Tea Light Shade

Welcome to this week’s edition of Thursday Craft 'n Chat. Every Thursday will feature a different crafty tip/technique from one of the Made Especially For You design team members. Click here to view last weeks tutorial on how to use pop tabs to make tags.


Hi there, it's Laura from Scrappin' Around The Clock!

A few weeks ago I created this wedding table decor lamp and wanted to share with you how to make it!


When I was surfing the net looking for inspiration for something to create for the Dance themed blog hop we had in May, I came across a site selling wedding table decor items and this is very similar to something they offered for sale. I thought to my self 'who would buy that when you can make it for peanuts!' (please tell me I am not the only one that talks out loud to themselves while surfing the net!   And now I want share with you how to make it.

I started by creating a template for the shade.  I had a pretty good idea of what shape it needed to be and hand drew it onto a piece of printer paper.  Here is the template I created for you.  If you print it our full size onto 8.5 x 11 inch printer paper it should work perfectly for you.
This is the basic template.

This template shows where I punched holes to weave my tulle through.  The dotted line just shows where you will add adhesive.
And this final template shows where I added my embossed image.
To start with, I cut out my template and traced it onto a piece of vellum.  Then I punched holes along the bottom edge (as shown above) to allow me to thread some tulle through.  You can keep this step in or leave it our or change it up all together, it is your call.

Then I stamped a flourish with VersaMark, just to the right of the centre point and added clear but sparkly embossing powder and heat set it.  You want to be a little more careful when heat embossing onto Vellum.

Next, I attached some flowers with a brad alongside the embossed image. The I adhered the two ends together to create the shade.  Make sure to only overlap the two ends slightly as you will need as much diameter as possible for your shade.

Now you can add your ribbon or tulle or whatever you feel is perfect for your shade.

All that is left to do now is to pop it onto a wine glass, add a tea light and turn down the lights!

Thanks for checking out my tutorial and let me know if you have any questions!

Laura
xoxo
www.scrappinaroundtheclock.blogspot.com

Tuesday, June 12, 2012

Malt Shoppe Hop Winners!


Thanks so much to all who participated in the Malt Shoppe Hop this past weekend! We hope you enjoyed seeing all our delicious projects.

As promised... here are the six winners from the hop! Congratulations, ladies!  

Adams Acres - $20 gift certificate
WINNER - MARCIA


As Cute As A Button - $25 gift certificate
WINNER - NANCY PARKER

Ginger Snap Scraps - $10 gift certificate
WINNER - KARON


Paper Piecings by Nikki - $25 gift certificate
WINNER - MICHELE FROM MS

Scraptastical Kreations - $20 gift certificate
WINNER - JENNIFER


The Stamping Boutique - 3 images of the winner's choice
WINNER - MEE CHELLE

If you're a winner, please email Ashley at especiallymadeblog@gmail.com by Tuesday June 19th to claim your prize. A new winner will be chosen if you're prize does not get claimed. 

Thanks again to all who participated!

Monday, June 11, 2012

Sketch-Inspired Graduation Card

It seems like the time between Mondays is getting faster and faster - I guess that's what happens when you're having fun! We're back with another challenge here at Made Especially For You, and this week is sketch week. You can make any type of card you'd like, as long as it's inspired by the following sketch:
Our sponsor this week is the fabulous Bugaboo Stamps. I must say, they've become one of my favorite digi stamp sites and I really look forward to working with their images each month. They're offering the randomly chosen winner 7 images of their choice, a $21 value! The winner will also be offered a one-week guest designer position. As always, the top three will have their cards displayed at MEFY and will receive a top three badge to display on their blogs. 

I chose this adorable owl graduation digi and sentiment from Bugaboo to use on this week's card. I had a lot of fun playing around with different ideas for the card, and here's what I finally came up with:


This is actually one of my favorite cards I've made in a while. I colored this cute little fella with my Prismacolor pencils and combined it with papers from the DCWV High School mat stack. I was worried all the little graduation caps would be too obnoxious, but I'm pleased with the way it turned out. If I could go back, I would repaint the 2012 numbers white instead of burgundy, I was trying to pull more red out of the background, and then realized the white would've looked better. Oh well! :) 

Stop by the Weekly Challenge page to get inspired by the sketch and to see what creations the design team has come up with. We'd love if you played along with us!

Ashley

Saturday, June 9, 2012

Do You Speak Cricut Saturday - Paisley

Looking for the Malt Shoppe Hop? Click here or scroll down to the next post :)
Welcome to this week’s edition of Do You Speak Cricut Saturday. Every Saturday will feature a different Cricut cartridge review from one of the Made Especially For You design team members. This feature was added to the blog in order to give potential cartridge buyers a better idea of what each cart has to offer. Click here to view last week's Block Party cartridge review.

Hi Everybody, Susie here with a review of the Cricut cartridge Paisley. This cartridge will be a real asset to your Cricut cartridge collection.  I've used this cartridge several times, it's a true go-to cartridge for me. 

Just look at all it's goodness!

I created this card this past Valentine's Day for my sweetie and placed the turtle's shell on an action wobble.  Fun!!

The feature keys on this cartridge has many other images aside from the ones you see as the main image in the handbook. 

If you can find this cart, you should definitely consider purchasing it.  The feature keys on this cartridge offer the standard layer keys along with a button key which gives you images to go with the main image, but could also be used on other projects and cuts. There's a card/tab feature key that creates a card with a window for the button key's image, a word/wordblackout key and the standard shadow key that comes with most handbooks.  I didn't need to create new cards to show you what a great cartridge Paisley is...I simply referred to my own blog gallery to pull a few cards I'd already created using the Paisley cartridge in the past.


If you've looked at this cartridge and thought maybe it's not for you, give it a closer look and imagine all the beautiful projects/cards you can create when you Paisley to your collection.
Create a great day!
Related Posts Plugin for WordPress, Blogger...